Spinnaker Fleet Tools Screen Shots
Click here to
![]() Spinnaker Fleet Tools (version 1.01).
Spinnaker Fleet Tools (version 1.01).
Each time you open Spinnaker Fleet Tools you will start here.
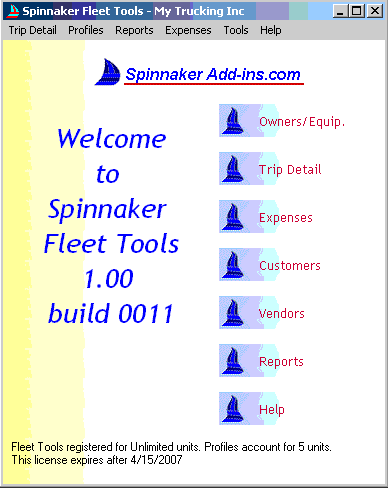  |
The default Owner is shown in the Caption of this dialog (My Trucking Inc). The Sample data set we send out is based on this owner name. In the bottom of the dialog you can see for how many trucks you are registered and when your registration will expire. By default our custom help comes up as well. We developed this help system because we often get very frustrated when looking for help on using new software (too many things to do before you get any information). We hope you will like this better as well.
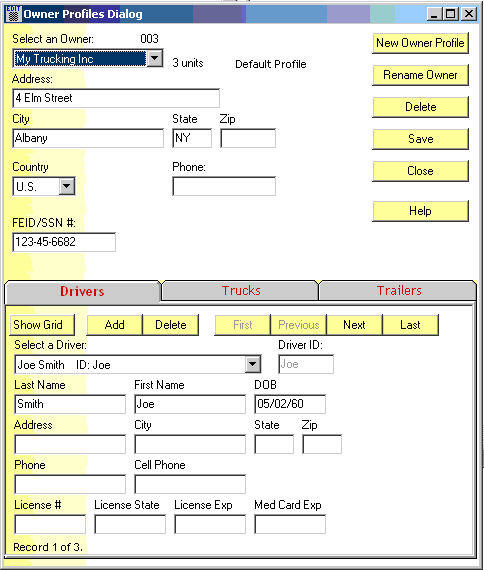
| The Owner Profiles dialog opens with the
default, or the first profile selected.
If you have a default profile, the program will always start up with that
profile
In the bottom of the dialog there are three tabs. they all work mostly the same and we will explain the things that are not as usual. When you click on Add, you can add an item. If you do, the focus will go to the first field that can logically be expected to be entered next. The captions of both the Add and the Delete button change to "Save" and "Undo". When you click Save the new item will be saved. When you click "Undo" the previous version will be restored. After either of those clicks the captions of those buttons will become "Add" and "Delete" again. When you click on Show Grid, you get a list in spread sheet look ("Grid Mode") that you can edit by clicking in a cell. pressing tab or Enter will move you to the next cell. This list can also be printed when you are in "Grid Mode". You can change the column widths by clicking and dragging the columns separators in the top row. If you click in one of the headers in the grid, the grid will be sorted. The first click sorts A-Z, the second click in the same column Z-A . Lastly, if you maximize the dialog in grid view, the grid will resize with it so you can see more, or everything.
|
 |
 |
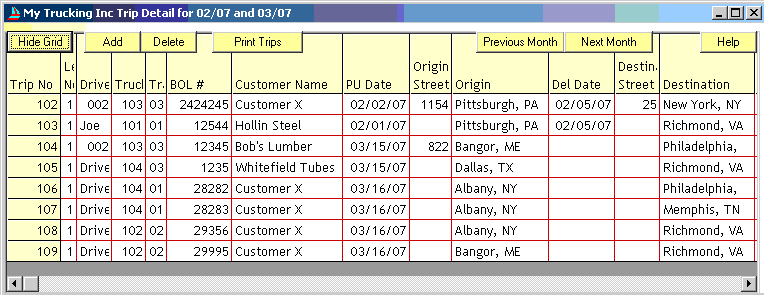
| The 'Trip Detail' button opens the Trip Detail
Dialog where you enter specific trip data for the equipment entered in the
'Owner Profiles' Dialog. This is the heart of the program. Here you enter
a whole range of trip data such as: origin/legs/destination, customer,
revenue, trip distance, weight, rate, trip- related expenses, etc. You can
look at each trip individually or use the Trip Grid to view a whole range
of trips.
Trip Detail Dialog Add Button/ Save Button Use the Add button to add trips for the selected fleet owner. When you click the Add button or when you click in a field to change an existing record you enter Edit mode and the label on the Add button changes to 'Save'. When you click to save changes the text on the button changes back to 'Add'. Delete Button/ Undo Button Use this button to delete trips for the selected fleet owner. The program will ask for your confirmation before deleting any record. But when you are in Edit mode to add or to change a record the label on the Delete button changes to 'Undo' so that you can erase changes without deleting the entire record. When you then click Save or Undo the label on the Save button changes back to 'Add' and the label on the Undo button changes back to 'Delete'. First/Previous/Next/Last Buttons These buttons let you scroll forward and back through your list of trips for the selected time period. Previous Month/Next Month Scroll through different time periods of completed trips with these buttons. Add Leg Button. You can add two more trip legs using this button. The 'Enter Trip Expenses' button opens the Expense Detail Dialog. When you open the Expense Detail dialog from the Trip Detail dialog you can enter any expense related specifically to this trip. The 'Rating Info' group box helps you calculate the Revenue for a trip leg. In the box 'Qty or Rate Type' you can either select a calculation option from the list, or enter a value (number of items, number of tons, etc.). In the 'Rate' box you enter how much you get paid for each item, weight, or mile. the 'Weight' box and the 'Dist' box will only be used for the calculation if you choose an item from the list in the 'Qty or Rate Type' box. The program will calculate the total and display it in the 'Revenue'-box. If a surcharge applies, you can either enter a value >1 to add a dollar amount to the Revenue, or a value between 0 and 1 to add a percentage to the Revenue. To enter a percentage you can also enter a value >1 followed by the '%' sign. Of course you can override these calculated amounts with your own entries. If you have Microsoft Mappoint installed on your computer, and you entered valid street addresses, cities, and states in the origin and destination boxes, you can calculate the distance by clicking on the 'Dist:' hyperlink. |
 |
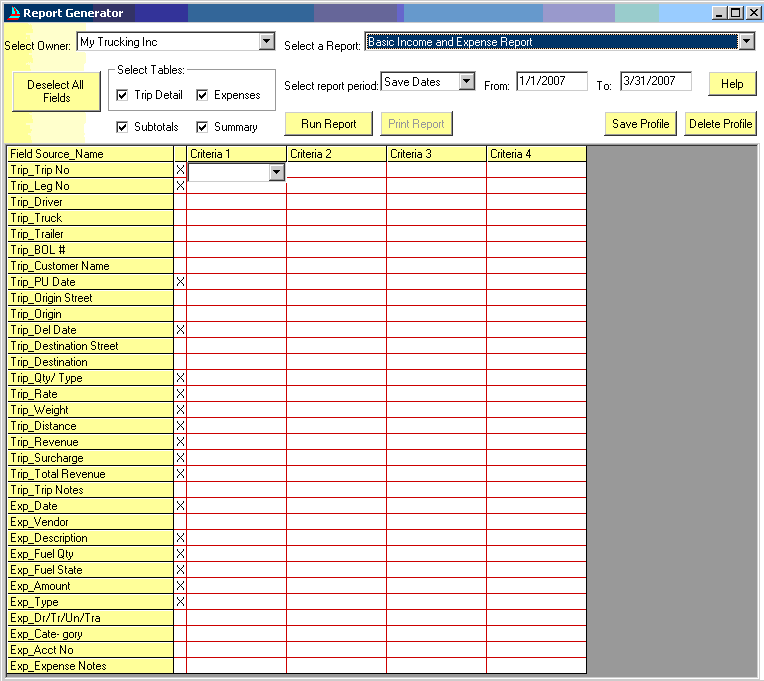
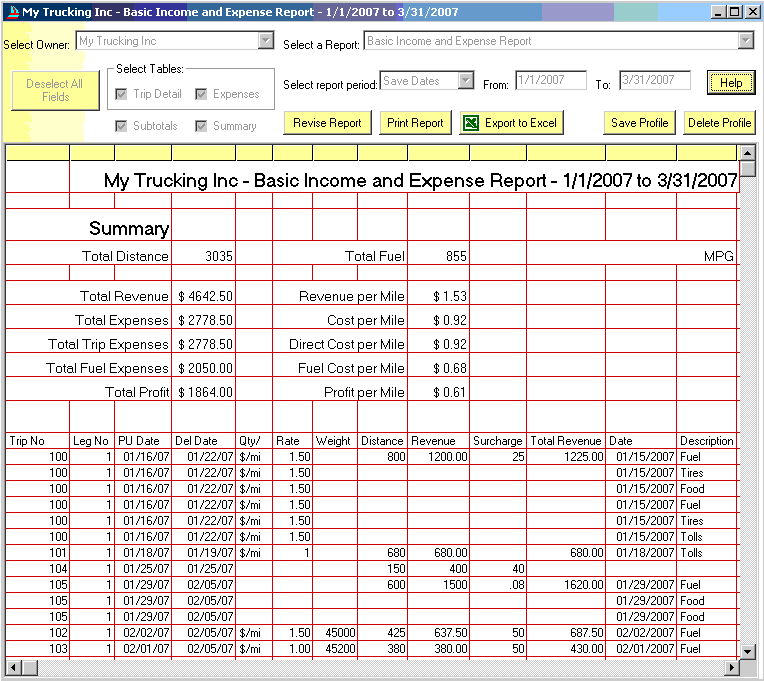
| The Report Generator will help you
create reports of your operations. Though you can easily create any report
you want as you go, we recommend saving reports that you like to a profile
so you can re use it the next time you want to run the same report, or a
report that is a lot like it. Currently the program allows for 1000 report
profiles, which we feel should be plenty for most people.
|
 |