|
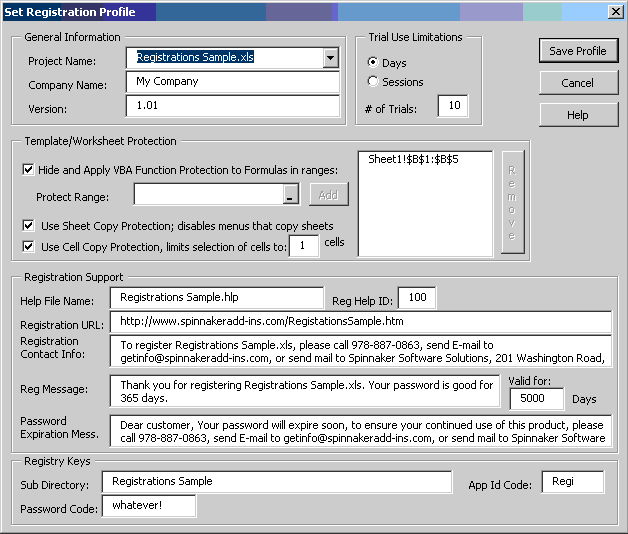
Project Name:
In this combo box you select the project that you want to compile. If your project is currently an add-in (these workbooks usually have an
"XLA" extension) it will not show up in the list unless you first set the
"isaddin" property to "false". You do this in the Visual Basic Editor by double clicking the desired add-in in the project explorer, and then typing
"thisworkbook.isaddin=false" in the immediate pane followed by pressing "Enter". The next time you activate this dialog, your add-in will show up in the list of projects. (Don’t forget to change your compiled project back into an add-in after inserting the registration module using the same procedure but then to "true").
(back to dialog)
Version:
In this box you can enter the version number of your project. If the first part of your version is a number, you can issue people who try your project a new trial period with each new release that has a higher version number. This gives your a chance to market each new version of your product to the complete population of possible customers again.
(back to dialog)
Company Name:
If you enter your company name here, it will show up as the title in every message/input box clarifying for the user which company they are dealing with.
(back to
dialog)
Days:
This means that the project can only be used for the specified # of Trial Days specified in the # of Trials box. One session is used for each time you open the project on a different day than the last time. This is particularly handy if it is likely that people will open and close your project often.
(back to dialog)
Sessions:
This means that the project can only be used for the specified # of Trial Sessions specified in the # of Trials box. One session is used for each time you open the project.
(back to dialog)
# of Trials:
You always enter a numerical value. If you don’t, the dialog will display 0. 0 means that the project can only be used if registered.
- Template/Worksheet Protection:
Hide
and Apply VBA Function Protection to Formulas in Ranges: This
feature will protect all not unprotected entries in every sheet in
which you specify a range. If you want to allow input cells in a
sheet, you should unprotect those cell prior to compiling the
project. In the ranges that you specify, this feature will
additionally:
1. hide the entries in those cells so you can't see the
formula
2. wrap the entries in those cells in a "dummy" function
that requires macros to be enabled to display correct values.
This makes it impossible to use the project with macros disabled.
To choose a range, click in the box next to "Protect
Range: ", select the range that you want to protect, click on
the "Add" button. The range will be listed in the
listbox next to the range box. To remove a range from your list,
click on the range in the list, and click on the
"Remove" button. You can protect as many ranges as you
want, but remember that the whole sheet will be protected except
for the cells that you manually set to unprotected before you
compile your project.
(back to dialog)
Use Sheet Copy Protection; disables menus that copy sheets
This feature will disable the "Edit" menu and the right mouse click menu when clicked over the sheet tab area as well as the right mouse worksheet menu bar. This makes it already very hard to copy anything out or your template, but you can still copy cells and paste them elsewhere (also in a different workbook!).
(back to dialog)
Use Cell Copy Protection, limits selection of cells to: x cells
This feature limits the number of cells you can select at one time. This also limits the ease with which you can simply copy the content of a sheet to a new workbook.
(back to dialog)
Help File Name:
In this box you can enter the name of the help file associated with your project. If the default name in the dialog box is not the name of your help file, feel free to edit it. If you don’t specify anything here, the help buttons in the message and input boxes will not be displayed.
(back to dialog)
Help ID:
In this box you specify the ID of the page in you help file that provides information about registering your product. The default is 100. If you don’t specify anything here, the help buttons in the message and input boxes will not be displayed.
(back to dialog)
Registration URL:
If you enter a web URL here, the user of your project can go to a registration page on the web to register you software. This can be your own web-site or a third party web-site that handles the transactions for you. Note: Sometimes going to a secure web page directly may pose a problem. In that case you have to use a standard web page that has a link to the secure web page.
(back to
dialog)
Registration Contact Info:
In this box you can enter information like: How to obtain a
password, or how to obtain sales information, etc. This is
especially handy when you don't supply a registration URL that
goes to your own web-site.
(back to dialog)
Reg. Message:
When a user registers the project successfully a confirmation
message will be displayed. In this box you can add your own custom
message such as how long their license lasts. If this box is left
blank only the standard message will be displayed.
(back to dialog)
Valid for:
Here you specify how many days a password will be valid. If you
don't want the password to expire, you just enter a very high
number here. If this box is left blank, the program will enter a
value of 5000 (about 15 years).
(back to dialog)
Password Expiration
Message:
When the password is about to expire, a new registration number
will be generated, and a new trial period will be started. In this
box you can notify the user that this will happen and tell them
how many days they have to apply for a new password if they want
to keep using the project.
(back to dialog)
Sub Directory:
This box specifies the name for the file that holds the initialization information. Be sure to specify something that will be unique in order to avoid names that already exist on your or your customer’s computer. If you don’t specify a valid name, the compiled project will not function.
(back to dialog)
App Identifier Code:
In this box you enter a code that can help you identify
which product someone is registering. You can make this code as
long or short as you want, but remember that the customer will be
instructed to send you this code with the six digit numerical code
that is generated by your project.
(back to dialog)
Password Code:
This term may be a little bit confusing, but expected is a nine digit code that will be used to specify which password will be used with which six digit number. If you don’t enter a nine digit code at all, your project will work without functional registration module. If you enter a code shorter than nine digits, for example 5, only the digits numerals 1,2,3,4, and 5 will be used in a password and numerals 6,7,8, and 9 will
be ignored for the assignment of a password. To assign a password for the default entry "whatever!" in the case that the registration number is 966212, you would replace the "9" with a "!", the "6" with a "v", the "2" with an "h", the "1" with a "w" resulting in the complete password:
"!vvhwh". Passwords are not case sensitive. (back to dialog)
|