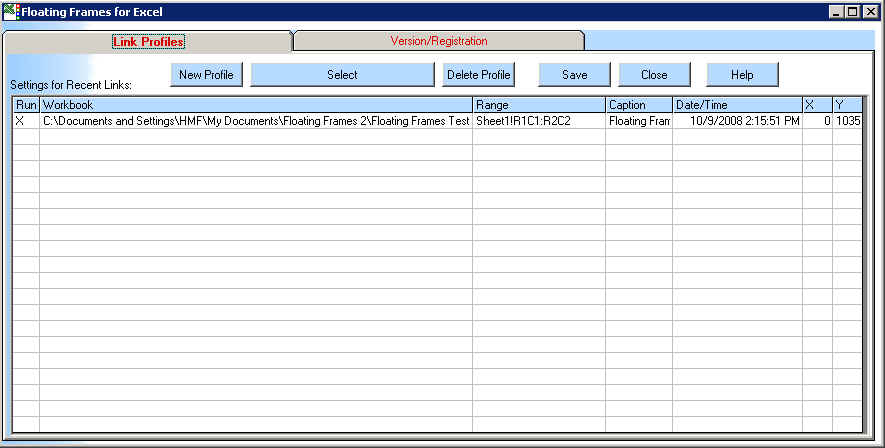
In this form you can select from existing profiles that you used earlier, or create a new profile."
When you click on the 'New Profile' -button, you can select an Excel workbook to link
to.
After you select a workbook, a range-box will be displayed on the chosen Excel workbook. When you click and drag in the sheet, a selection will be made. After you click 'OK' a link with that range in that workbook will be
created. Lastly you will be asked for a caption for the Excel data range you have selected. That will also be the caption of the window in the status
bar. By default a new profile will be set to load automatically at
startup of Floating Frames.
When you click the 'Select' -button a new floating frame will be linked to an excel workbook using the properties in the selected item in the
list. If you click on any profile in the list, the caption of this button will change to 'Show' and the caption field will be added to the caption (i.e. 'Show My Floating
Frame').
The 'Delete Profile' -button will delete the currently selected profile from the list of recent
profiles. Before the profile is removed from the list, you will be asked for confirmation."
The 'Save' -button will save the current entries in the grid for later
use.
The 'Close' -button will close this dialog. No changes will be made to the current floating
frames' settings. If you made changes to any profiles, or deleted obsolete profiles, you will be asked whether you want to save the changes you
made.
In this box the settings for the most recent 20 links are displayed.
When you click on one, the caption of the 'Select' -button will change to something like: 'Show my Floating Frame Caption'. When you subsequently click on that button a new floating frame will display data according to the selected
profile. If you double-click on any cell in the list except in the first column, you will be able to edit the cell in an
input box. If you cancel this procedure no changes will be made. If you click on any cell in the first column, you toggle that profile on/off for being shown at startup of Floating Frames. If you also add Floating Frames to the startup group in the programs menu option of your computer, all these windows can be visible and their workbooks open at startup of your PC. This can provide
tremendous time savings during a restart."
The Floating Frame:
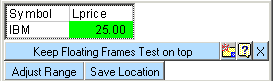
The 'Keep WindowCaption on top' -button allows you keep this window on top so when you activate a different application, this window will still be visible, even if the other window is
active. When you click this button this feature will be activated and the button will read: WindowCaption stays on top. Clicking the button again will disable this feature.
This will allow you to keep all or some windows on top so you can always see changes that may
occur.
The 'Adjust Range' -button allows you to use a different range in the currently linked
workbook. This is particularly helpful if you already selected everything but then realize you need a few more, or less cells to
watch. The link with this file, it's new data range, and maybe it's new caption will also be written to the list of recent
links.
The 'Save Location' -button allows you to save the left top corner of the window to the Link
Profiles.
This will allow the program to load this window in the same location each time you start Floating Frames for
Excel.
The 'Add New Window' -button will activate the Link Profiles form so
you can display another window like the one you see now.
The 'Close Window' -button will close the active window. Other windows that may be open will still be
available.
The Data Grid displays the selected data range in the selected worbook.
When you click on the Data Grid, the buttons become visible, or hidden depending on their current
state. If you right click on the data grid, you can 'Edit' or 'Open' the
workbook in this frame.
The Floating Frame is a dialog without a caption that can display an Excel range. In one session you can have multiple floating frames that display parts of any Excel
workbook. To move it around you click on its data grid once. The dialog expands and now you can click on an unused part of the frame and drag it to any location you want. When you click the
data grid again, the dialog will shrink to just the size of the grid.
If you double-click on the grid, the associated Excel window will be
activated.
Register Floating Frames for Excel
In order to register Floating Frames for Excel, you will need to provide us with at least the following information:
Your name, E-mail address, credit card number, credit card expiration date, and the registration
number(FLOA#########).
The cost of the software is $30.00 per year."
|